NST Mapping Tools: Difference between revisions
(Created page with "= NST Mapping Tools = == Overview == NST 20 provides a suite of tools for creating '''map overlays''' that allow users to personalize map interfaces within the '''NST WUI.''...") |
No edit summary |
||
| Line 5: | Line 5: | ||
NST 20 provides a suite of tools for creating '''map overlays''' that allow users to personalize map interfaces within the '''NST WUI.''' These tools are available for use with any Google map interface provided by the '''NST WUI'''. After navigating to a Google map interface within the '''NST WUI''', click on the NST Mapping Tools icon located at the top-right corner of the map screen([[File:nst_map_icon_small.png]]): | NST 20 provides a suite of tools for creating '''map overlays''' that allow users to personalize map interfaces within the '''NST WUI.''' These tools are available for use with any Google map interface provided by the '''NST WUI'''. After navigating to a Google map interface within the '''NST WUI''', click on the NST Mapping Tools icon located at the top-right corner of the map screen([[File:nst_map_icon_small.png]]): | ||
[[File:nst_map_icon.png]] | [[File:nst_map_icon.png|center|800x600px]] | ||
The NST Mapping Toolbar will appear. This toolbar contains a number of buttons that can be used for various mapping tasks within the '''NST WUI'''. | The NST Mapping Toolbar will appear. This toolbar contains a number of buttons that can be used for various mapping tasks within the '''NST WUI'''. | ||
[[File:nst_mapping_toolbar.png]] | [[File:nst_mapping_toolbar.png|center|800x600px]] | ||
== The NST Mapping Toolbar == | == The NST Mapping Toolbar == | ||
| Line 37: | Line 37: | ||
The latitude/longitude button creates a grid overlay for the current map, displaying latitude and longitude values. | The latitude/longitude button creates a grid overlay for the current map, displaying latitude and longitude values. | ||
[[File:latitude.png]] | [[File:latitude.png|center|800x600px]] | ||
=== Measurement Tools === | === Measurement Tools === | ||
| Line 49: | Line 49: | ||
The first button([[File:nst_add_measurement.png]]) allows you to '''add''' a ruler without opening any further dialog boxes. The two endpoints of a ruler can be individually dragged to any location on the map, and the distance between them will be automatically updated. To change the unit that represents the distance, left-click on the bubble that displays the distance. Right-clicking on either endpoint of the ruler will open a new tab in your browser containing directions from the first point to the second point in Google Maps. Each ruler will by default have a circular '''handle''' as its midpoint, which can be used to drag the entire ruler around the map. Right-clicking on a ruler's handle will open the Distance Measurement Tool Editor window for that ruler. | The first button([[File:nst_add_measurement.png]]) allows you to '''add''' a ruler without opening any further dialog boxes. The two endpoints of a ruler can be individually dragged to any location on the map, and the distance between them will be automatically updated. To change the unit that represents the distance, left-click on the bubble that displays the distance. Right-clicking on either endpoint of the ruler will open a new tab in your browser containing directions from the first point to the second point in Google Maps. Each ruler will by default have a circular '''handle''' as its midpoint, which can be used to drag the entire ruler around the map. Right-clicking on a ruler's handle will open the Distance Measurement Tool Editor window for that ruler. | ||
[[File:ruler.png]] | [[File:ruler.png|center|800x600px]] | ||
The second button([[File:nst_toggle_measurement.png]]) allows you to '''toggle''' the Distance Measurement Tool Editor window. This window gives you more precise control over the selected ruler, and presents a few additional options to control the ruler's behavior. | The second button([[File:nst_toggle_measurement.png]]) allows you to '''toggle''' the Distance Measurement Tool Editor window. This window gives you more precise control over the selected ruler, and presents a few additional options to control the ruler's behavior. | ||
[[File:measurement_window.png]] | [[File:measurement_window.png|center|800x600px]] | ||
The location of each endpoint can be manually entered into a text field, and all units of distance are supported. You can also insert markers at each endpoint of the ruler, as well as toggle a geodesic curve and handles for each ruler. Circular overlays can be created with their edges resting on an endpoint of the ruler, and their radii set to the length of the ruler. | The location of each endpoint can be manually entered into a text field, and all units of distance are supported. You can also insert markers at each endpoint of the ruler, as well as toggle a geodesic curve and handles for each ruler. Circular overlays can be created with their edges resting on an endpoint of the ruler, and their radii set to the length of the ruler. | ||
| Line 66: | Line 66: | ||
display information about the given overlay. Size, perimeter and area are described in several different ways. The Ruler Tool window also has buttons to toggle the color of the overlay borders, and set the overlay to a number of default shapes. | display information about the given overlay. Size, perimeter and area are described in several different ways. The Ruler Tool window also has buttons to toggle the color of the overlay borders, and set the overlay to a number of default shapes. | ||
[[File:ruler_tool.png]] | [[File:ruler_tool.png|center|800x600px]] | ||
=== The Google Maps Drawing Manager === | === The Google Maps Drawing Manager === | ||
| Line 74: | Line 74: | ||
Clicking this button will toggle the '''Google Maps Drawing Manager Widget''', located on the top-right corner of the map. | Clicking this button will toggle the '''Google Maps Drawing Manager Widget''', located on the top-right corner of the map. | ||
[[File:google_overlay_toolbar.png]] | [[File:google_overlay_toolbar.png|center|800x600px]] | ||
The Google Maps Drawing Manager Widget allows you to draw custom shapes as overlays onto the map. It also allows you to place markers, draw lines, and reposition any previously-drawn overlays. When toggled, the "Stop Drawing" icon([[File:stop_drawing_icon.png]]) will be selected by default. While this icon is selected, you will be able to select overlays and drag them around the map. Selecting the "Add a Marker" icon([[File:add_marker_icon.png]]) will | The Google Maps Drawing Manager Widget allows you to draw custom shapes as overlays onto the map. It also allows you to place markers, draw lines, and reposition any previously-drawn overlays. When toggled, the "Stop Drawing" icon([[File:stop_drawing_icon.png]]) will be selected by default. While this icon is selected, you will be able to select overlays and drag them around the map. Selecting the "Add a Marker" icon([[File:add_marker_icon.png]]) will | ||
allow you to place a marker at any location on the map by left-clicking. The "Draw a Circle" icon([[File:draw_circle_icon.png]]) allows you to draw a circle by clicking on the point where you would like the center to be, and moving your mouse outward to set the diameter. The "Draw a Line" icon([[File:draw_line_icon.png]]) allows you to draw a line by clicking at the starting and ending points of the line. The "Draw a Shape" icon([[File:draw_shape_icon.png]]) allows you to draw a custom shape one line at a time. The "Draw a Rectangle" icon([[File:Example.jpg]]) allows you to create a rectangle. Remember that each of these icons will stay selected until a different icon on the toolbar is selected. For example, if you would like to create a circle and then reposition it, you would need to select the "Draw a Circle" icon, draw the circle, and then select the "Stop Drawing" icon in order to reposition the circle. | allow you to place a marker at any location on the map by left-clicking. The "Draw a Circle" icon([[File:draw_circle_icon.png]]) allows you to draw a circle by clicking on the point where you would like the center to be, and moving your mouse outward to set the diameter. The "Draw a Line" icon([[File:draw_line_icon.png]]) allows you to draw a line by clicking at the starting and ending points of the line. The "Draw a Shape" icon([[File:draw_shape_icon.png]]) allows you to draw a custom shape one line at a time. The "Draw a Rectangle" icon([[File:Example.jpg]]) allows you to create a rectangle. Remember that each of these icons will stay selected until a different icon on the toolbar is selected. For example, if you would like to create a circle and then reposition it, you would need to select the "Draw a Circle" icon, draw the circle, and then select the "Stop Drawing" icon in order to reposition the circle. | ||
[[File:overlays_example.png]] | [[File:overlays_example.png|center]] | ||
=== The NST Map Drawing Editor === | === The NST Map Drawing Editor === | ||
Revision as of 15:43, 16 December 2014
NST Mapping Tools
Overview
NST 20 provides a suite of tools for creating map overlays that allow users to personalize map interfaces within the NST WUI. These tools are available for use with any Google map interface provided by the NST WUI. After navigating to a Google map interface within the NST WUI, click on the NST Mapping Tools icon located at the top-right corner of the map screen(![]() ):
):
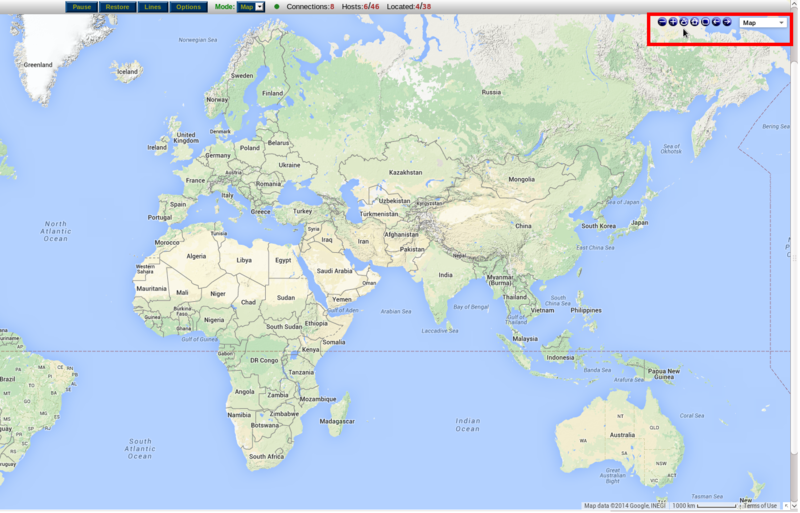
The NST Mapping Toolbar will appear. This toolbar contains a number of buttons that can be used for various mapping tasks within the NST WUI.
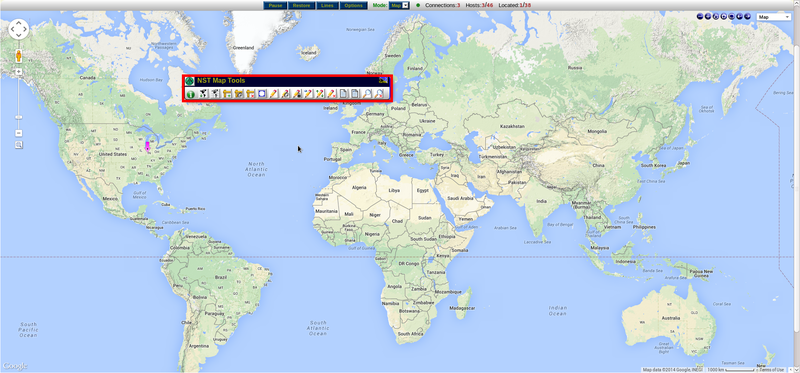
The NST Mapping Toolbar
The NST Mapping Toolbar allows you to edit and manipulate the Google map pages of the NST WUI in a variety of ways. You can use distance measurement tools, create custom regions and calculate their areas, draw lines, shapes and other overlay graphics, search specific sections of the map using Google Maps, and more. You can even save any changes you make to these maps and load them for further use later.
Information Icon
Many of the NST Mapping Tools have areas that provide additional information about their functionality. When you see the information icon, outlined in red int the image above, you may hover your mouse over it for more information on the toolbar in question.
Home/World Map Views
The Home/World Map View button brings up a window that allows you to set the Google Map Home or World Map views. Once these views are set, you can use the "Zoom to Home Map View"(![]() ) and "Zoom to World Map View"(
) and "Zoom to World Map View"(![]() ) buttons on the top-right corner of the map screen to quickly toggle between these two views.
) buttons on the top-right corner of the map screen to quickly toggle between these two views.
Latitude/Longitude Grid
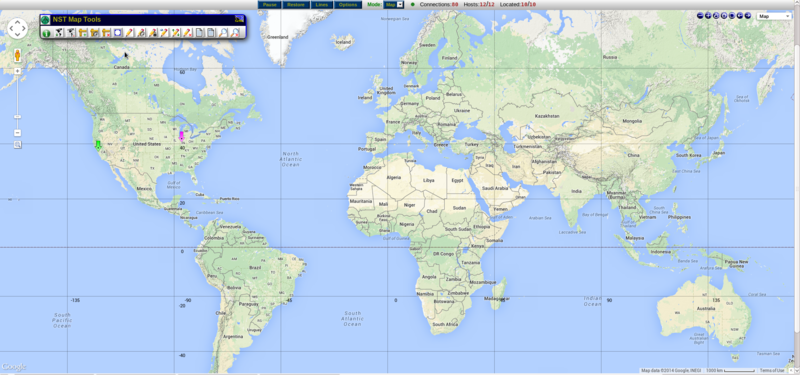
The latitude/longitude button creates a grid overlay for the current map, displaying latitude and longitude values.
Measurement Tools
The measurement tools are one of the main features of the NST Mapping Tools. They allow you to add rulers to the map which measure the precise distance between two points. The NST meaurement tools can represent these distances in a variety of ways. Miles and kilometers are used for standard physical distance, while the milliseconds representation can be used for estimating ping speed in a network connection. The precise latitude and longitude coordinates can be displayed, as well as the number of pixels between the two points.
There are three buttons on the NST Mapping Toolbar that are used with the measurement tools:
The first button(![]() ) allows you to add a ruler without opening any further dialog boxes. The two endpoints of a ruler can be individually dragged to any location on the map, and the distance between them will be automatically updated. To change the unit that represents the distance, left-click on the bubble that displays the distance. Right-clicking on either endpoint of the ruler will open a new tab in your browser containing directions from the first point to the second point in Google Maps. Each ruler will by default have a circular handle as its midpoint, which can be used to drag the entire ruler around the map. Right-clicking on a ruler's handle will open the Distance Measurement Tool Editor window for that ruler.
) allows you to add a ruler without opening any further dialog boxes. The two endpoints of a ruler can be individually dragged to any location on the map, and the distance between them will be automatically updated. To change the unit that represents the distance, left-click on the bubble that displays the distance. Right-clicking on either endpoint of the ruler will open a new tab in your browser containing directions from the first point to the second point in Google Maps. Each ruler will by default have a circular handle as its midpoint, which can be used to drag the entire ruler around the map. Right-clicking on a ruler's handle will open the Distance Measurement Tool Editor window for that ruler.
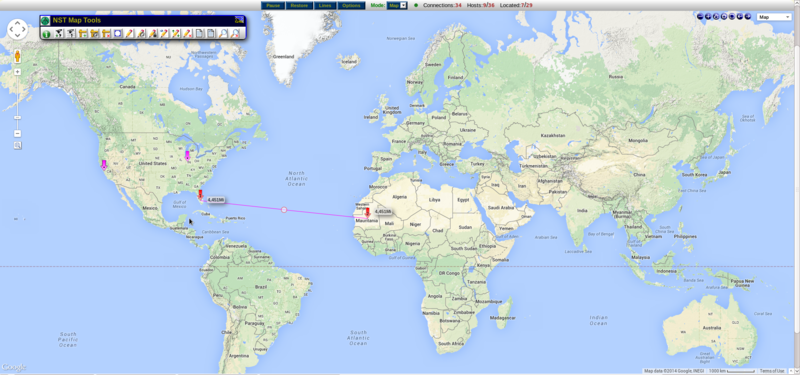
The second button(![]() ) allows you to toggle the Distance Measurement Tool Editor window. This window gives you more precise control over the selected ruler, and presents a few additional options to control the ruler's behavior.
) allows you to toggle the Distance Measurement Tool Editor window. This window gives you more precise control over the selected ruler, and presents a few additional options to control the ruler's behavior.
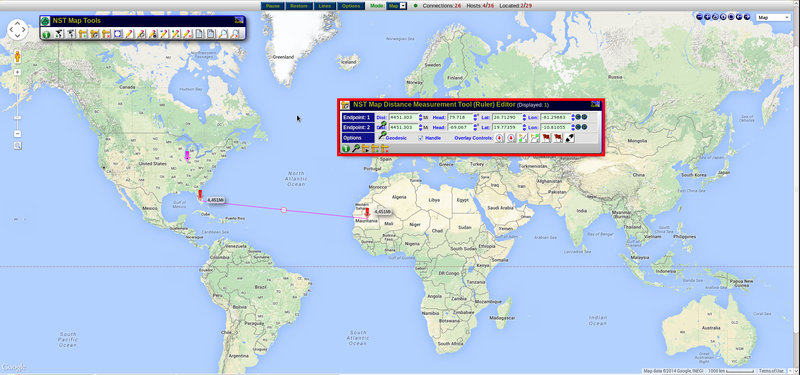
The location of each endpoint can be manually entered into a text field, and all units of distance are supported. You can also insert markers at each endpoint of the ruler, as well as toggle a geodesic curve and handles for each ruler. Circular overlays can be created with their edges resting on an endpoint of the ruler, and their radii set to the length of the ruler.
The third button(![]() ) allows you to remove all rulers on the map. Individual rulers can be removed using the ctrl+click shortcut.
) allows you to remove all rulers on the map. Individual rulers can be removed using the ctrl+click shortcut.
The NST Ruler Tool
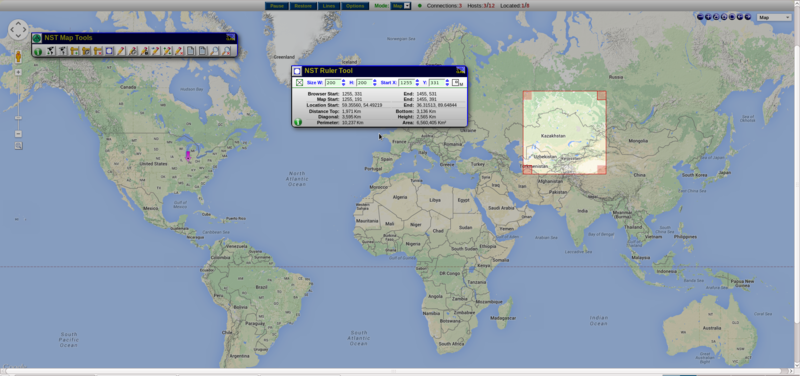
The NST Ruler Tool, not to be confused with the NST measurement tool, allows you to create rectangular overlays for use in area calculations. Clicking this button will bring up the NST Ruler Tool window, and automatically create a rectangular overlay for use with this window. The dimensions of this overlay can be defined using the text fields inside the Ruler Tool window. The borders can also be dragged to specify the size. The bulk of the Ruler Tool window is used to display information about the given overlay. Size, perimeter and area are described in several different ways. The Ruler Tool window also has buttons to toggle the color of the overlay borders, and set the overlay to a number of default shapes.
The Google Maps Drawing Manager
Clicking this button will toggle the Google Maps Drawing Manager Widget, located on the top-right corner of the map.
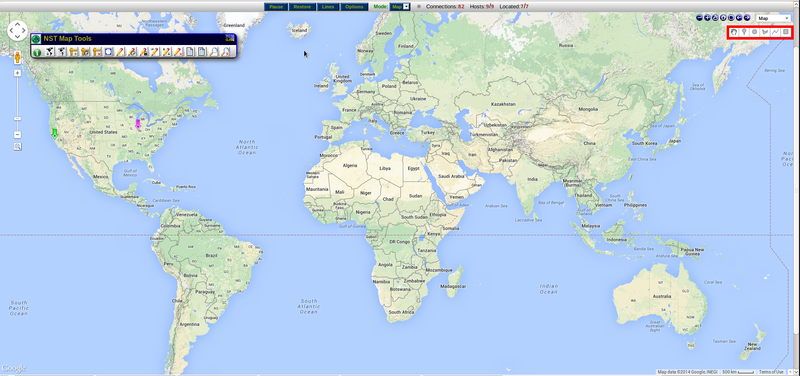
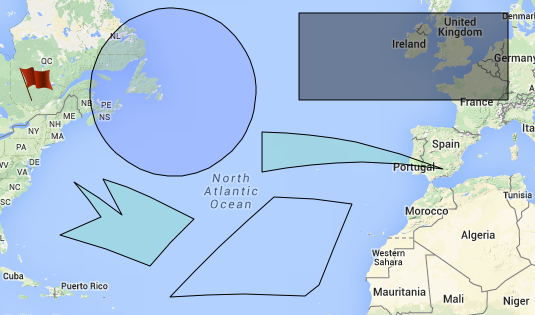
The Google Maps Drawing Manager Widget allows you to draw custom shapes as overlays onto the map. It also allows you to place markers, draw lines, and reposition any previously-drawn overlays. When toggled, the "Stop Drawing" icon(![]() ) will be selected by default. While this icon is selected, you will be able to select overlays and drag them around the map. Selecting the "Add a Marker" icon(
) will be selected by default. While this icon is selected, you will be able to select overlays and drag them around the map. Selecting the "Add a Marker" icon(![]() ) will
allow you to place a marker at any location on the map by left-clicking. The "Draw a Circle" icon(
) will
allow you to place a marker at any location on the map by left-clicking. The "Draw a Circle" icon(![]() ) allows you to draw a circle by clicking on the point where you would like the center to be, and moving your mouse outward to set the diameter. The "Draw a Line" icon(
) allows you to draw a circle by clicking on the point where you would like the center to be, and moving your mouse outward to set the diameter. The "Draw a Line" icon(![]() ) allows you to draw a line by clicking at the starting and ending points of the line. The "Draw a Shape" icon(
) allows you to draw a line by clicking at the starting and ending points of the line. The "Draw a Shape" icon(![]() ) allows you to draw a custom shape one line at a time. The "Draw a Rectangle" icon(File:Example.jpg) allows you to create a rectangle. Remember that each of these icons will stay selected until a different icon on the toolbar is selected. For example, if you would like to create a circle and then reposition it, you would need to select the "Draw a Circle" icon, draw the circle, and then select the "Stop Drawing" icon in order to reposition the circle.
) allows you to draw a custom shape one line at a time. The "Draw a Rectangle" icon(File:Example.jpg) allows you to create a rectangle. Remember that each of these icons will stay selected until a different icon on the toolbar is selected. For example, if you would like to create a circle and then reposition it, you would need to select the "Draw a Circle" icon, draw the circle, and then select the "Stop Drawing" icon in order to reposition the circle.
