HowTo Geolocate traceroute Data: Difference between revisions
(Created page with '= Quick Start = Once you've set up your NST system such that it can geolocate IP addresses (see: HowTo Setup The NST System To Geolocate Data), you will be able to geolocate…') |
|||
| Line 1: | Line 1: | ||
= Quick Start = | = Quick Start = | ||
Once you've set up your NST system such that it can geolocate IP addresses (see: [[HowTo Setup The NST System To Geolocate Data]]), you will be able to geolocate ''traceroute'' information and view the results in [http://earth.google.com/ | Once you've set up your NST system such that it can geolocate IP addresses (see: [[HowTo Setup The NST System To Geolocate Data]]), you will be able to geolocate ''traceroute'' information and view the results in [http://earth.google.com/ Google Earth]. | ||
== Locating The nsttraceroute Page == | == Locating The "nsttraceroute" Page == | ||
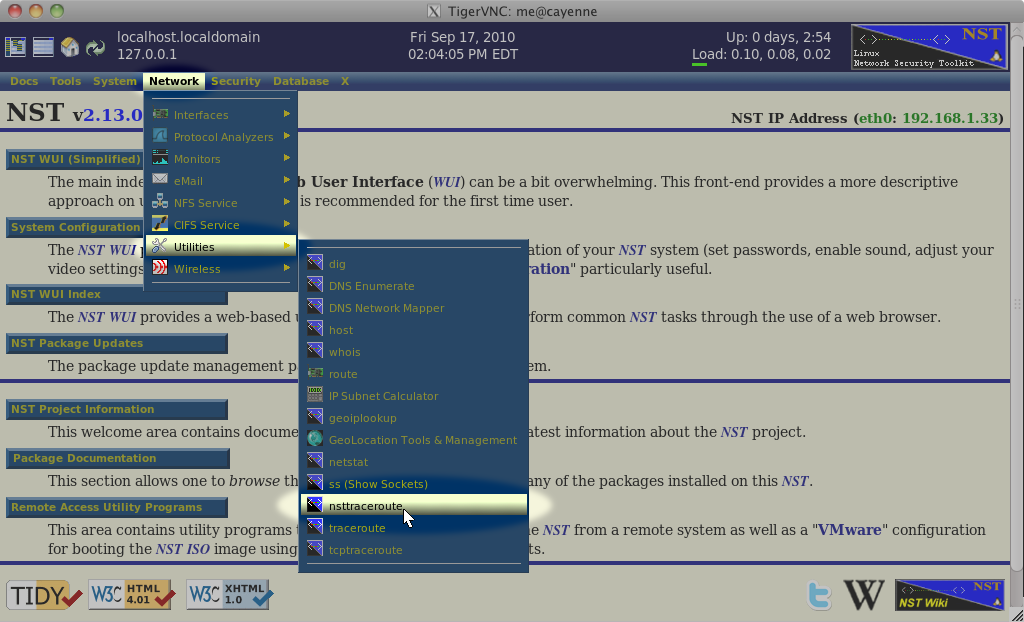
The following shows how you locate the "''nsttraceroute''" page using the NST WUI: | |||
[[File:nsttraceroute-menu-select.png|center|frame|Finding the "nsttraceroute" page]] | [[File:nsttraceroute-menu-select.png|center|frame|Finding the "nsttraceroute" page]] | ||
== Starting The Trace == | == Starting The Trace == | ||
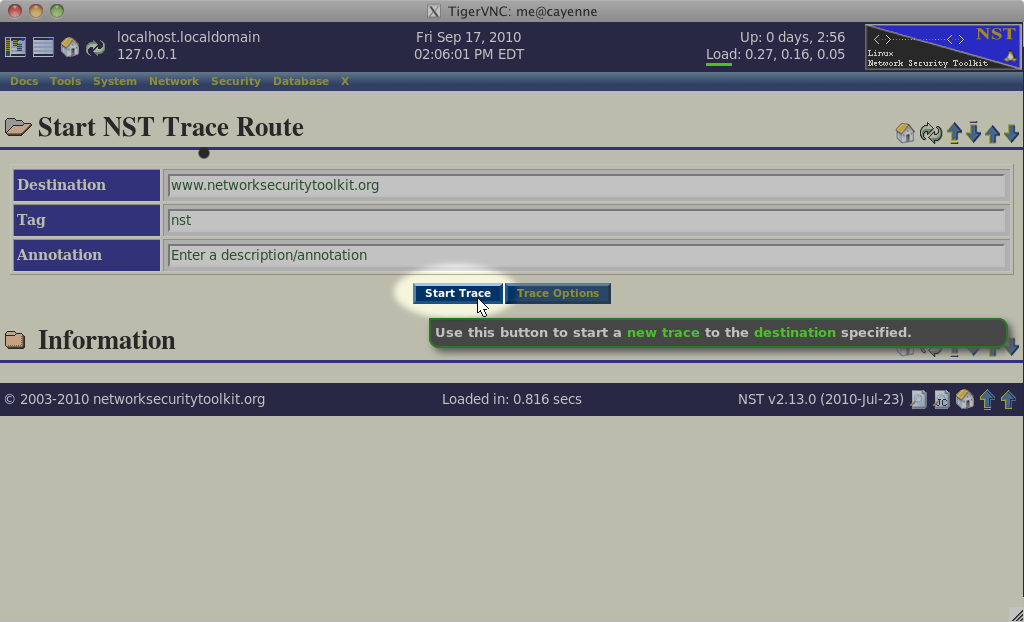
After filling in or adjusting the values in the''Destination'', ''Tag'', and ''Annotation Fields'', press the ''Start Trace'' button to begin the "''nsttraceroute''" command. | |||
[[File:nsttraceroute-start-trace.png|center|frame|Starting the process of geolocating "traceroute" data]] | [[File:nsttraceroute-start-trace.png|center|frame|Starting the process of geolocating "traceroute" data]] | ||
== Wait For The Trace To Complete == | == Wait For The Trace To Complete == | ||
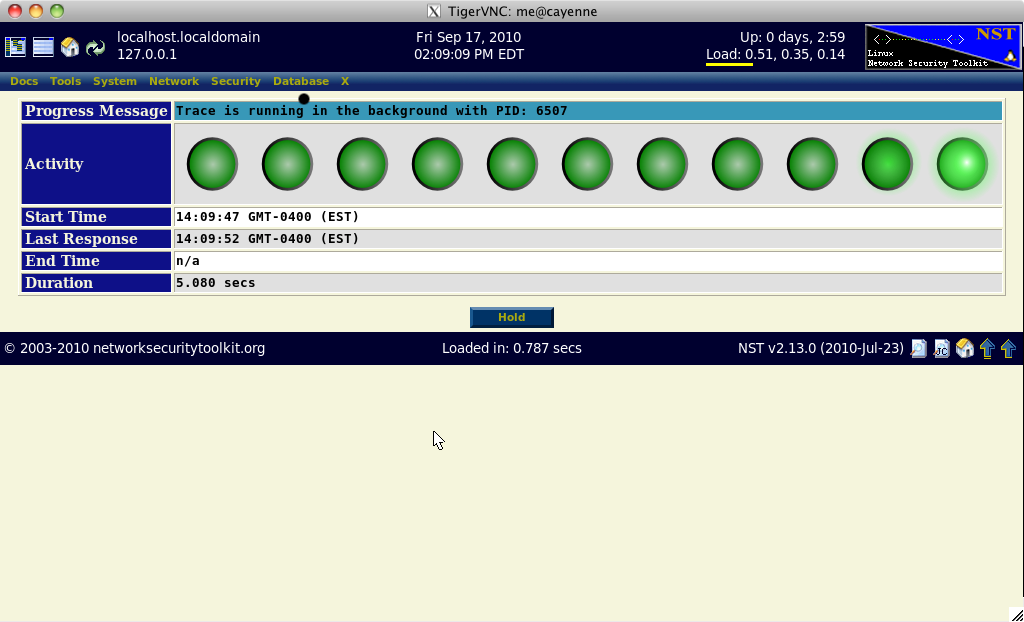
The "''nsttraceroute''" command will take a bit of time to complete. While it is running, you will see the progress page shown below. After the process completes, the page will automatically transition to the results view (unless you press the ''Hold'' button first). | |||
[[File:nsttraceroute-running.png|center|frame|The progress page displayed while waiting for the "nsttraceroute" script to complete]] | [[File:nsttraceroute-running.png|center|frame|The progress page displayed while waiting for the "nsttraceroute" script to complete]] | ||
== Select the "K" (KMZ) Action Button == | == Select the "K" (KMZ) Action Button == | ||
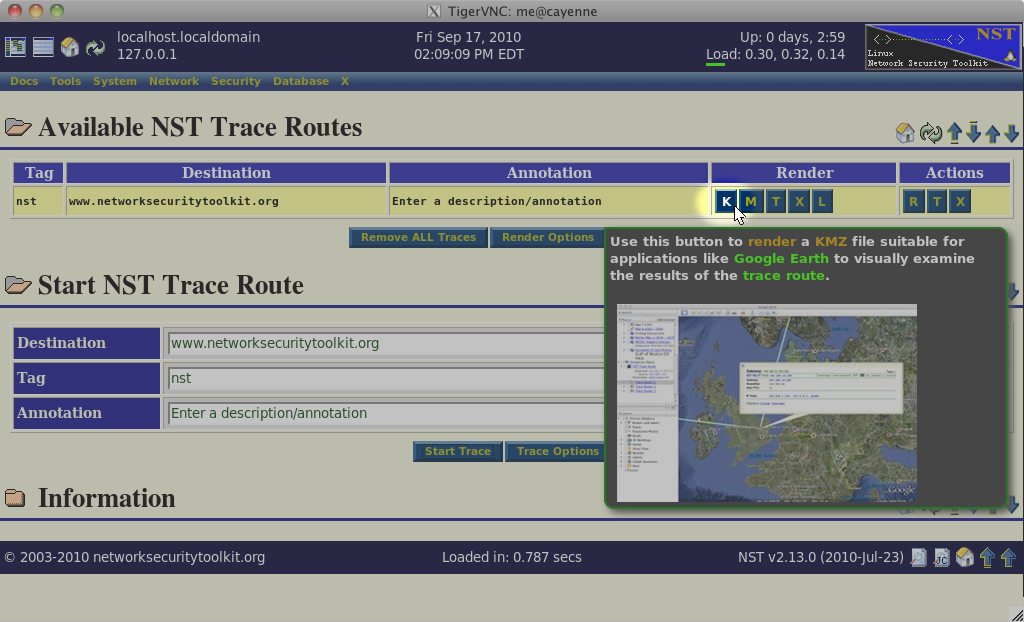
Each time you run the "''nsttraceroute''" command, the results will appear in the results table at the top of the page. Select the ''K'' action button to download a KMZ rendering of the results which can be viewed in ''Google Earth''. | |||
[[File:nsttraceroute-k-button.png|center|frame|Using the "K" action button to download the "nsttraceroute" results as a KMZ file]] | [[File:nsttraceroute-k-button.png|center|frame|Using the "K" action button to download the "nsttraceroute" results as a KMZ file]] | ||
== Selecting Google Earth To View The Results == | |||
If ''Google Earth'' is properly installed on your system, the KMZ file should open automatically, OR you might be prompted as shown below. If you are prompted, then make sure that ''Google Earth'' is selected and then press the ''Open'' button as shown below: | |||
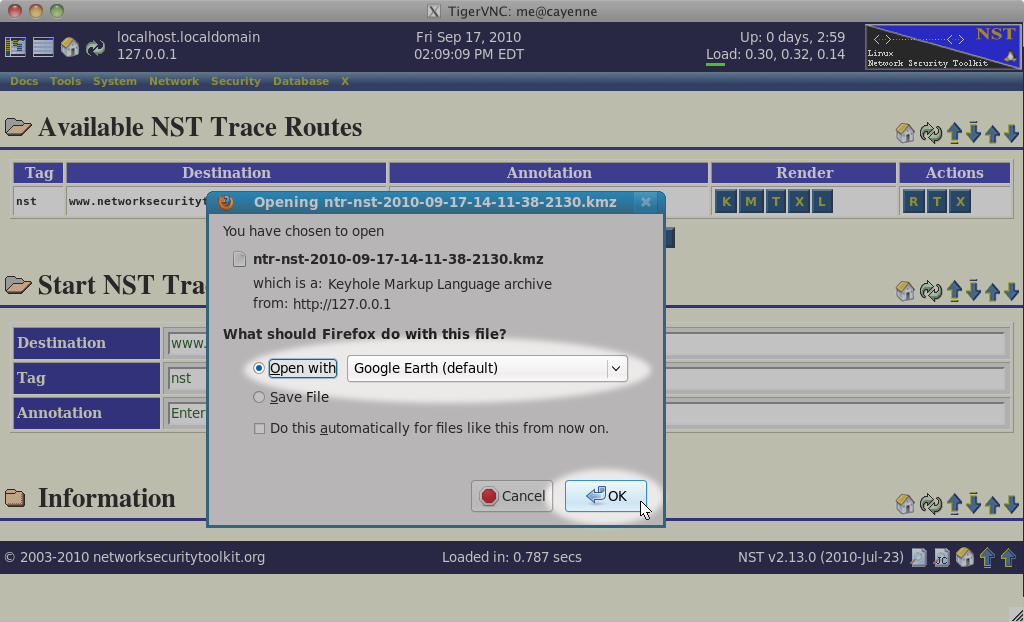
[[File:nsttraceroute-open-with-google-earth.png|center|frame|Opening the KMZ file produced by "nsttraceroute" with Google Earth]] | [[File:nsttraceroute-open-with-google-earth.png|center|frame|Opening the KMZ file produced by "nsttraceroute" with Google Earth]] | ||
== Viewing The "nsttraceroute" KMZ File In Google Earth == | == Viewing The "nsttraceroute" KMZ File In Google Earth == | ||
Once the KMZ file has been downloaded and opened by ''Google Earth'', you should see your data displayed as a set of ''bulls eyes'' with connection lines. It might look something like the following: | |||
[[File:nsttraceroute-kansas.png|center|frame|Viewing the results in Google Earth]] | [[File:nsttraceroute-kansas.png|center|frame|Viewing the results in Google Earth]] | ||
You should be able to explore the data collected. Selecting items on the map, or on the side navigation panel should display ''balloon messages'' providing detailed information. | |||
= Doing More From The "nsttraceroute" Page = | = Doing More From The "nsttraceroute" Page = | ||
Revision as of 14:52, 17 September 2010
Quick Start
Once you've set up your NST system such that it can geolocate IP addresses (see: HowTo Setup The NST System To Geolocate Data), you will be able to geolocate traceroute information and view the results in Google Earth.
Locating The "nsttraceroute" Page
The following shows how you locate the "nsttraceroute" page using the NST WUI:
Starting The Trace
After filling in or adjusting the values in theDestination, Tag, and Annotation Fields, press the Start Trace button to begin the "nsttraceroute" command.
Wait For The Trace To Complete
The "nsttraceroute" command will take a bit of time to complete. While it is running, you will see the progress page shown below. After the process completes, the page will automatically transition to the results view (unless you press the Hold button first).
Select the "K" (KMZ) Action Button
Each time you run the "nsttraceroute" command, the results will appear in the results table at the top of the page. Select the K action button to download a KMZ rendering of the results which can be viewed in Google Earth.
Selecting Google Earth To View The Results
If Google Earth is properly installed on your system, the KMZ file should open automatically, OR you might be prompted as shown below. If you are prompted, then make sure that Google Earth is selected and then press the Open button as shown below:
Viewing The "nsttraceroute" KMZ File In Google Earth
Once the KMZ file has been downloaded and opened by Google Earth, you should see your data displayed as a set of bulls eyes with connection lines. It might look something like the following:
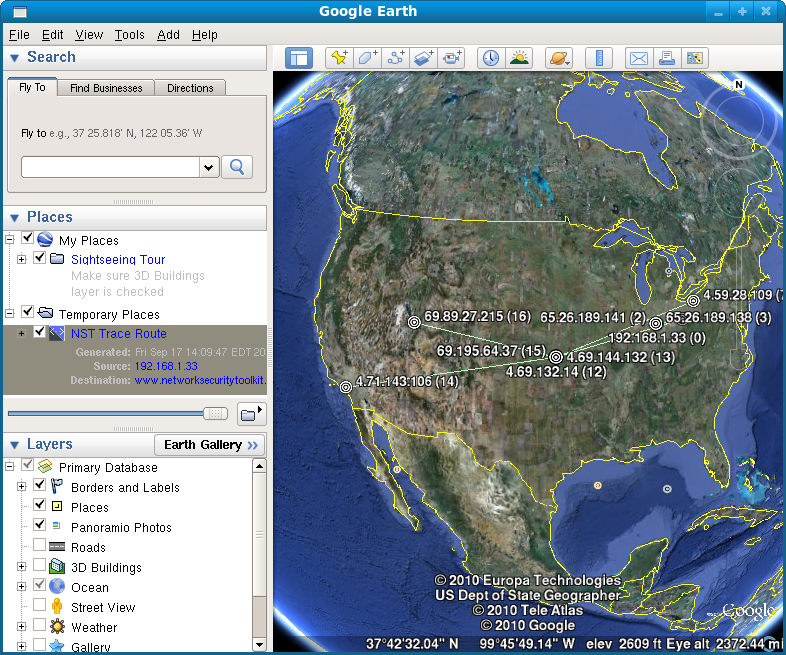
You should be able to explore the data collected. Selecting items on the map, or on the side navigation panel should display balloon messages providing detailed information.