Getting Started: Difference between revisions
| Line 35: | Line 35: | ||
The text based console interface is the default boot more for NST Live. If you don't type anything, your NST Live system should automatically boot in this mode. To skip the ''delay'', simply press the ''Enter Key'' while the ''Console'' boot option is highlighted. | The text based console interface is the default boot more for NST Live. If you don't type anything, your NST Live system should automatically boot in this mode. To skip the ''delay'', simply press the ''Enter Key'' while the ''Console'' boot option is highlighted. | ||
[[Image:boot-screen.png|thumb|center]] | |||
== Graphical Desktop == | == Graphical Desktop == | ||
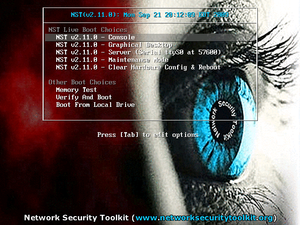
If you'd prefer to use a graphical Fluxbox or GNOME desktop, use the down arrow key to select the ''Graphical Desktop'' option and press the ''Enter Key'' on the screen below: | If you'd prefer to use a graphical Fluxbox or GNOME desktop, use the down arrow key to select the ''Graphical Desktop'' option and press the ''Enter Key'' on the screen below: | ||
[[Image:boot-screen.png|thumb|center]] | |||
= After Booting = | = After Booting = | ||
Revision as of 10:52, 24 September 2009
What Files Can I Download And Use?
Full NST Live Distribution
This file contains the full NST distribution and is known as: "NST Live". It is a Live bootable Linux distribution based on Fedora and provides easy access to best-of-breed Open Source Network Security Applications and should run on most x86/x86_64 platforms. One can download this file, burn it to a DVD, boot the DVD and then start using NST.
NST Minimal Live
The size of the full "NST Live ISO" is much larger than can fit on CD media. For those systems that can not boot off of a DVD or a USB flash drive and the intent is to install NST to the system hard drive, use this minimal NST Live ISO. This ISO contains all the necessary files to build the full NST distribution. See the NST Minimal section for installation of a NST Minimal Live ISO.
NST VM Configuration Archive
A Zip archive that contains the configuration files necessary for booting NST Live under VMware Player, Server or Workstation for those folks that want to build their own NST Virtual Machine (VM).
PreBuilt Virtual Machine Archive
A prebuilt Virtual Machine archive that contains the full NST distribution which can be easily launched using VMware Player, Server or Workstation for those folks that do not want to build their own VM using NST Live.
NST Source Archive
This compressed archive contains the entire source tree used to build the NST distribution.
NST Web Site Documentation
This compressed archive contains a snapshot of the NST web site at the time of the distribution release.
NST PDF Documentation
This compressed archive contains a snapshot of the NST documentation in PDF format at the time of the distribution release.
What Can I Do With The NST Live ISO Image?
Burn To DVD
Create Bootable USB Thumbdrive
Boot It Under VMware
Booting The System
Console
The text based console interface is the default boot more for NST Live. If you don't type anything, your NST Live system should automatically boot in this mode. To skip the delay, simply press the Enter Key while the Console boot option is highlighted.

Graphical Desktop
If you'd prefer to use a graphical Fluxbox or GNOME desktop, use the down arrow key to select the Graphical Desktop option and press the Enter Key on the screen below:

After Booting
 For NST Live Usage
- Login as the root user with the initial default password of nst2003
- Run nstpasswd to
 To Install To Hard Disk
- Login as the root user with the initial default password of nst2003
- Run nstpasswd to
Console Mode
Graphical Desktop Session
- Login as the Live System User using the default password of nst2003.
- Double click on the Install icon on the desktop.
- Reboot the system.