NST Mapping Tools: Difference between revisions
No edit summary |
No edit summary |
||
| Line 4: | Line 4: | ||
[[File:Thunderbolt.png|frame|left|'''[[Feature Release Symbol | <center>NST 20<br /> SVN: 6434</center>]]''']]NST 20 provides a suite of tools for creating '''map overlays''' that allow users to personalize map interfaces within the '''NST WUI.''' These tools are available for use with any Google map interface provided by the '''NST WUI'''. This article provides a brief overview of each major feature offered by the NST Mapping Tools. | [[File:Thunderbolt.png|frame|left|'''[[Feature Release Symbol | <center>NST 20<br /> SVN: 6434</center>]]''']]NST 20 provides a suite of tools for creating '''map overlays''' that allow users to personalize map interfaces within the '''NST WUI.''' These tools are available for use with any Google map interface provided by the '''NST WUI'''. This article provides a brief overview of each major feature offered by the NST Mapping Tools. | ||
| | ||
| Line 13: | Line 11: | ||
| | ||
| | ||
<div class="centerBlock"><div class="noteMessage">'''Note:''' The NST Mapping tools work best with the Google Chrome browser. To install Google Chrome, follow the instructions in [[Google_Applications|this article]].</div></div> | |||
== The NST Mapping Toolbar == | == The NST Mapping Toolbar == | ||
Revision as of 13:35, 27 December 2014
NST Mapping Tools
Overview

SVN: 6434
NST 20 provides a suite of tools for creating map overlays that allow users to personalize map interfaces within the NST WUI. These tools are available for use with any Google map interface provided by the NST WUI. This article provides a brief overview of each major feature offered by the NST Mapping Tools.
The NST Mapping Toolbar
After navigating to a Google map interface within the NST WUI, click on the NST Mapping Tools icon located at the top-right corner of the map screen(![]() ):
):
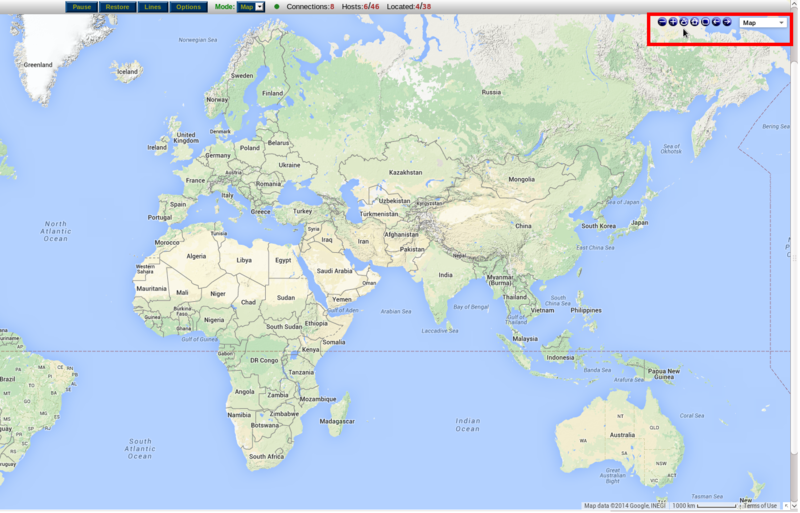
The NST Mapping Toolbar will appear. This toolbar contains a number of buttons that can be used for various mapping tasks within the NST WUI.
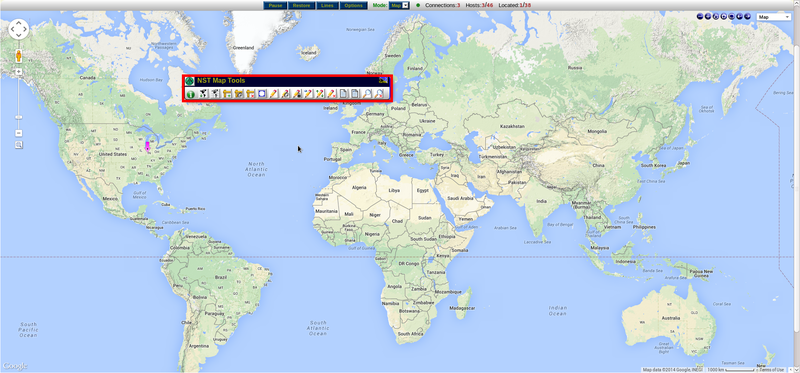
The NST Mapping Toolbar allows you to edit and manipulate the Google map pages of the NST WUI in a variety of ways. You can use distance measurement tools, create custom regions and calculate their areas, draw lines, shapes and other overlay graphics, search specific sections of the map using Google Maps, and more. You can even save any changes you make to these maps and load them for further use later.
Information Icon
Many of the NST Mapping Tools have areas that provide additional information about their functionality. When you see the information icon, outlined in red int the image above, you may hover your mouse over it for more information on the toolbar in question.
Home/World Map Views
The Home/World Map View button brings up a window that allows you to set the Google Map Home or World Map views. Once these views are set, you can use the "Zoom to Home Map View"(![]() ) and "Zoom to World Map View"(
) and "Zoom to World Map View"(![]() ) buttons on the top-right corner of the map screen to quickly toggle between these two views.
) buttons on the top-right corner of the map screen to quickly toggle between these two views.
Latitude/Longitude Grid
The latitude/longitude button creates a grid overlay for the current map, displaying latitude and longitude values.
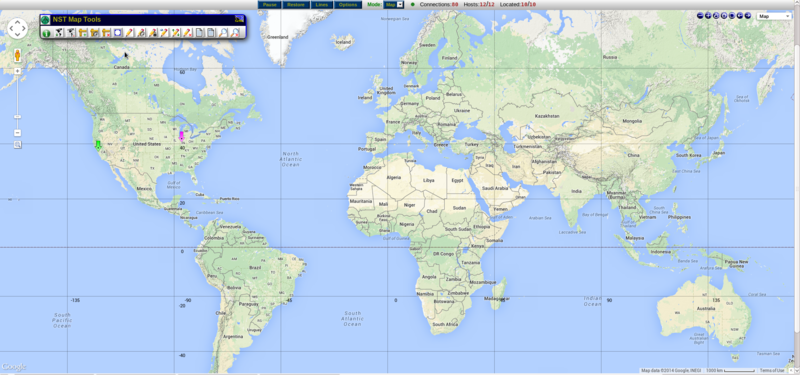
Measurement Tools
The measurement tools are one of the main features of the NST Mapping Tools. They allow you to add rulers to the map which measure the precise distance between two points. The NST measurement tools can represent these distances in a variety of ways. Miles and kilometers are used for standard physical distance, while the milliseconds representation can be used for estimating ping speed in a network connection. The precise latitude and longitude coordinates can be displayed, as well as the number of pixels between the two points.
There are three buttons on the NST Mapping Toolbar that are used with the measurement tools:
The first button(![]() ) allows you to add a ruler without opening any further dialog boxes. The two endpoints of a ruler can be individually dragged to any location on the map, and the distance between them will be automatically updated. To change the unit that represents the distance, left-click on the bubble that displays the distance. Right-clicking on either endpoint of the ruler will open a new tab in your browser containing directions from the first point to the second point in Google Maps. Each ruler will by default have a circular handle as its midpoint, which can be used to drag the entire ruler around the map. Right-clicking on a ruler's handle will open the Distance Measurement Tool Editor window for that ruler.
) allows you to add a ruler without opening any further dialog boxes. The two endpoints of a ruler can be individually dragged to any location on the map, and the distance between them will be automatically updated. To change the unit that represents the distance, left-click on the bubble that displays the distance. Right-clicking on either endpoint of the ruler will open a new tab in your browser containing directions from the first point to the second point in Google Maps. Each ruler will by default have a circular handle as its midpoint, which can be used to drag the entire ruler around the map. Right-clicking on a ruler's handle will open the Distance Measurement Tool Editor window for that ruler.
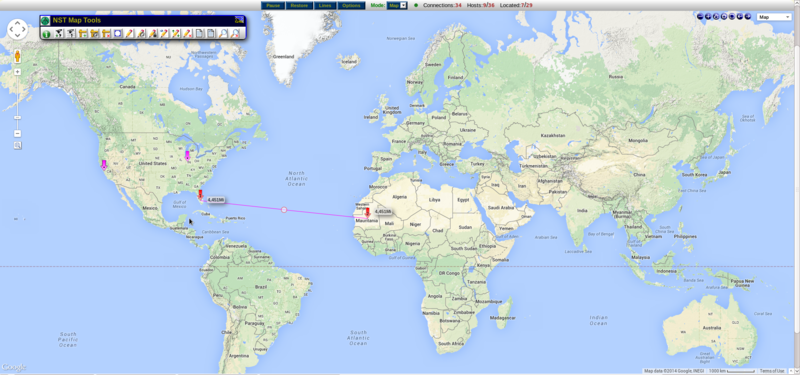
The second button(![]() ) allows you to toggle the Distance Measurement Tool Editor window. This window gives you more precise control over the selected ruler, and presents a few additional options to control the ruler's behavior.
) allows you to toggle the Distance Measurement Tool Editor window. This window gives you more precise control over the selected ruler, and presents a few additional options to control the ruler's behavior.
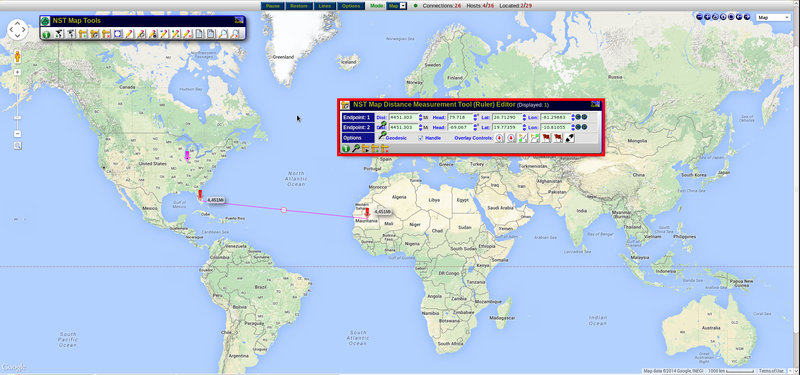
The location of each endpoint can be manually entered into a text field, and all units of distance are supported. You can also insert markers at each endpoint of the ruler, as well as toggle a geodesic curve and handles for each ruler. Circular overlays can be created with their edges resting on an endpoint of the ruler, and their radii set to the length of the ruler.
The third button(![]() ) allows you to remove all rulers on the map. Individual rulers can be removed using the ctrl+click shortcut.
) allows you to remove all rulers on the map. Individual rulers can be removed using the ctrl+click shortcut.
The NST Ruler Tool
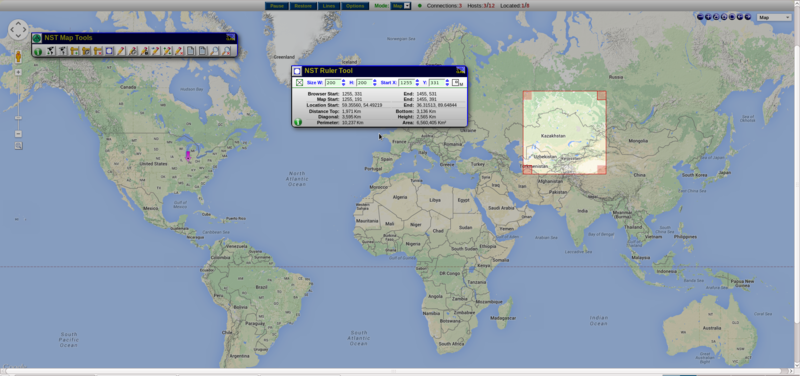
The NST Ruler Tool, not to be confused with the NST measurement tool, allows you to create rectangular overlays for use in area calculations. Clicking this button will bring up the NST Ruler Tool window, and automatically create a rectangular overlay for use with this window. The dimensions of this overlay can be defined using the text fields inside the Ruler Tool window. The borders can also be dragged to specify the size. The bulk of the Ruler Tool window is used to display information about the given overlay. Size, perimeter and area are described in several different ways. The Ruler Tool window also has buttons to toggle the color of the overlay borders, and set the overlay to a number of default shapes.
The Google Maps Drawing Manager
Clicking this button will toggle the Google Maps Drawing Manager Widget, located on the top-right corner of the map.
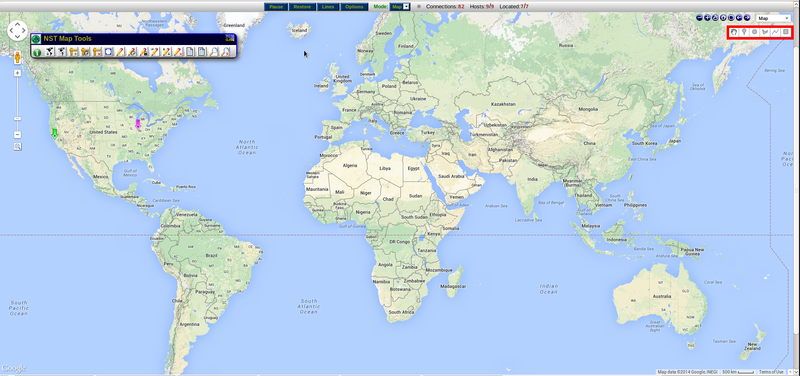
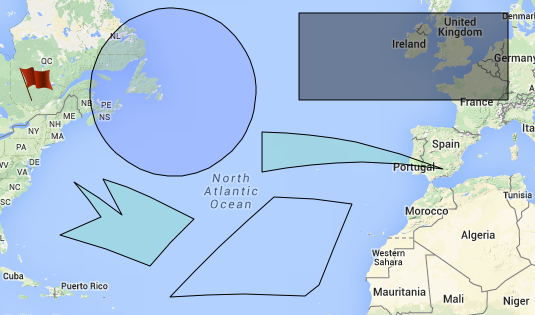
The Google Maps Drawing Manager Widget allows you to draw custom shapes as overlays onto the map. It also allows you to place markers, draw lines, and reposition any previously-drawn overlays. When toggled, the "Stop Drawing" icon(![]() ) will be selected by default. While this icon is selected, you will be able to select overlays and drag them around the map. Selecting the "Add a Marker" icon(
) will be selected by default. While this icon is selected, you will be able to select overlays and drag them around the map. Selecting the "Add a Marker" icon(![]() ) will
allow you to place a marker at any location on the map by left-clicking. The "Draw a Circle" icon(
) will
allow you to place a marker at any location on the map by left-clicking. The "Draw a Circle" icon(![]() ) allows you to draw a circle by clicking on the point where you would like the center to be, and moving your mouse outward to set the diameter. The "Draw a Line" icon(
) allows you to draw a circle by clicking on the point where you would like the center to be, and moving your mouse outward to set the diameter. The "Draw a Line" icon(![]() ) allows you to draw a line by clicking at the starting and ending points of the line. The "Draw a Shape" icon(
) allows you to draw a line by clicking at the starting and ending points of the line. The "Draw a Shape" icon(![]() ) allows you to draw a custom shape one line at a time. The "Draw a Rectangle" icon(
) allows you to draw a custom shape one line at a time. The "Draw a Rectangle" icon(![]() ) allows you to create a rectangle. Remember that each of these icons will stay selected until a different icon on the toolbar is selected. For example, if you would like to create a circle and then reposition it, you would need to select the "Draw a Circle" icon, draw the circle, and then select the "Stop Drawing" icon in order to reposition the circle.
) allows you to create a rectangle. Remember that each of these icons will stay selected until a different icon on the toolbar is selected. For example, if you would like to create a circle and then reposition it, you would need to select the "Draw a Circle" icon, draw the circle, and then select the "Stop Drawing" icon in order to reposition the circle.
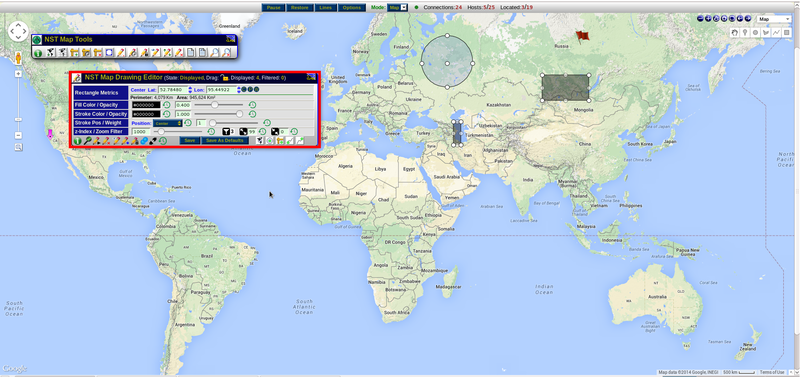
The NST Map Drawing Editor
The NST Map Drawing Editor allows you to edit overlays that have been created with the Google Maps Drawing Manager Widget. When this button is clicked, the NST Map Drawing Editor window will appear, and you will be able to select any overlays on the map for editing. The Map Drawing Editor contains quite a bit of functionality, and it will change based on what types of overlays you have selected. To select an overlay, simply click on it and its information will be displayed with the Map Drawing Editor window. To deselect the overlay, click on it again. Multiple overlays may be selected at the same time.
The locations of the overlays can be specified using the text fields. The radius of circles can be edited using a text field as well. All shapes(circles, rectangles and custom shapes) have a fill color and stroke color attribute, as well as opacity sliders for each attribute. The outer strokes of shapes can be repositioned(inside, outside or center), and their thickness can be changed. The "Z-index/Zoom Filter" attribute can be used to set a certain map zoom level where the overlay will disappear. Markers share many of the attributes of shapes, but they add the ability to set captions, and the marker icon can be changed to a variety of shapes. The Map Drawing Editor can be used to save, delete or duplicate any overlays on the map.
Toggle Global Draggable State
This button on the NST Mapping Toolbar can be used to toggle a global draggable state on all overlays on the map. This will prevent or allow the overlays to be dragged to other locations. This global setting can be overridden for individual overlays using the NST Map Drawing Editor.
Toggle Overlay Visibility
Clicking this button will toggle visibility for all overlays on the map.
The Drawing Overlay Storage Manager
The Drawing Overlay Storage Manager Widget can be opened with this button. The Drawing Overlay Storage Manager allows you to save and load map overlays in different groups. This is useful when you have created a set of overlays that you would like to keep for future sessions, or share with other NST machines.
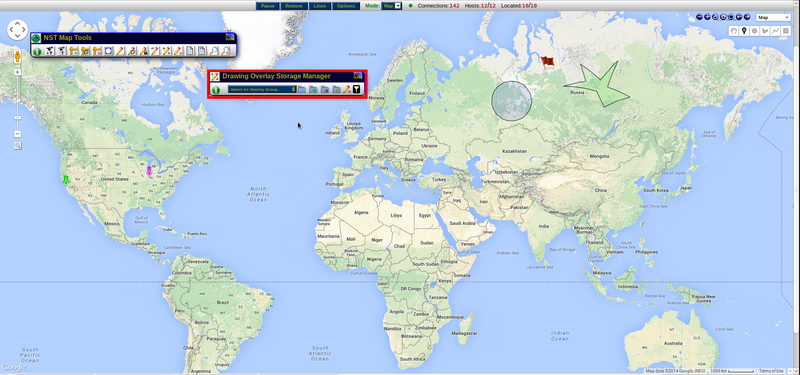
To save the current group of overlays, click the "Save" icon(![]() ). You will be prompted to enter a name for the group, and that group will be added to the drop-down list containing all your overlay groups. You can overwrite previous saved groups by entering the same name the next time you save. To remove a group of overlay items, choose the relevant group from the drop-down list and click the "Remove" icon(
). You will be prompted to enter a name for the group, and that group will be added to the drop-down list containing all your overlay groups. You can overwrite previous saved groups by entering the same name the next time you save. To remove a group of overlay items, choose the relevant group from the drop-down list and click the "Remove" icon(![]() ). You can load previously-saved groups of overlays into the current map by selecting the relevant group from the drop-down list and clicking the "Load" icon(
). You can load previously-saved groups of overlays into the current map by selecting the relevant group from the drop-down list and clicking the "Load" icon(![]() ). To set a group of overlays to appear every time the map is loaded, click the "Automatic Loading" icon(
). To set a group of overlays to appear every time the map is loaded, click the "Automatic Loading" icon(![]() ).
).
Delete All Overlays
Clicking this button will delete all overlays placed on the map. A confirmation is required to follow through with this operation.
The NST Map Label Editor
The NST Map Label Editor allows you to add text labels as overlays to a map. Clicking the Label Editor button on the NST mapping toolbar causes the NST Map Label Editor window to appear.
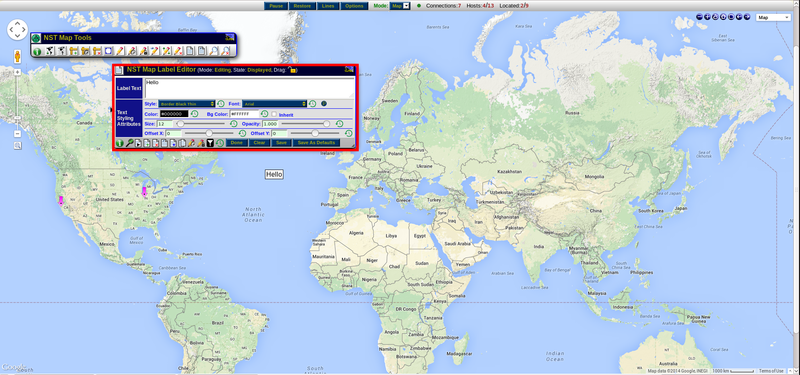
The main field of the NST Map Label Editor is the text field where you can supply the text for the label. In addition, the Map Label Editor comes with a host of features for editing your text-based labels. Text size, color, offset and opactiy can all be adjusted from within the Map Label Editor window. When you are ready to insert your label onto the map, click the "Insert Label" icon(![]() ). Your label will be inserted onto the map, where you can drage it to the appropriate position. Like all other overlays, labels can be deleted with the ctrl+click combination.
). Your label will be inserted onto the map, where you can drage it to the appropriate position. Like all other overlays, labels can be deleted with the ctrl+click combination.
Toggle Label Visibility
Clicking this button will toggle the visibility of all text-based labels on the map.
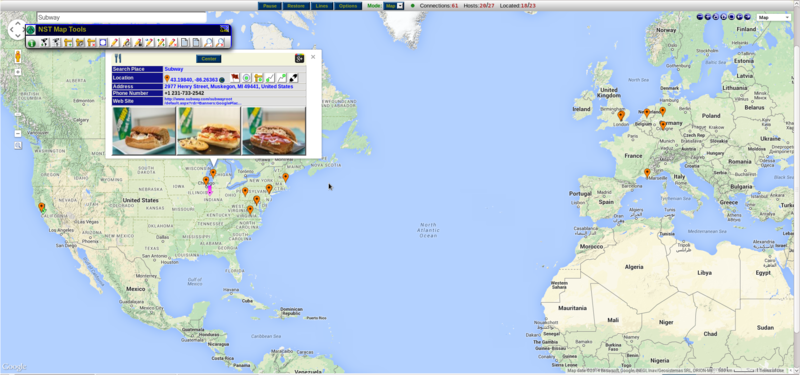
Google Places Search Box
Clicking this button will toggle the appearance of a search bar on the top-left corner of the map. This search bar can be used to perform a Google Places search. Any results returned by this search will generate icons on the map corresponding to that result. These icons can then be moused over to show more information. Right-clicking on one of these icons will open a new tab in your browser with the Google+ page coresponding to that result.
Delete Search Place Icons
Clicking this button will remove all recently-created search icons from the map.
Going Further
Screencasts
There is at least one planned screencast that will showcase some of the more advanced features of the NST Mapping Tools. When it is completed, it will be posted here.


